プログラミング言語RubyのフレームワークであるRuby on RailsでBootstrapを使う方法について解説します。
※Bootstrapとは何かを学習したい人は、Bootstrapについて解説した記事をご覧ください。
Ruby on RailsでBootstrapを使えば、少ない工程でWeb開発ができるでしょう。
本記事ではWeb開発経験のある筆者がRuby on RailsでBootstrapを使う方法について、実際にBootstrapでボタンをを生成することを行いながら使いながら解説します。
ぜひ最後まで読んで、Ruby on RailsにおけるBootstrapの使い方を学習してください。
公開日:2017年4月13日
\文字より動画で学びたいあなたへ/
Udemyで講座を探す >Ruby on RailsでBootstrapを使おう!(プロジェクトの作成)
まずは「rails new」コマンドで新たなプロジェクト(アプリケーション)を作成しましょう。
ターミナルを開いて、デスクトップに「bootstrap_app」というプロジェクト(アプリケーション)を作成します。
以下のコマンドをターミナルに打ち込みましょう。
|
1 2 |
$ cd desktop $ rails new bootstrap_app |
そして、「bootstrap_app」のフォルダに移動します。
以下のコマンドをターミナルに打ち込みます。
|
1 |
$ cd bootstrap_app |
そして、ローカルサーバーを立ち上げて、うまくプロジェクト(アプリケーション)ができているかを確認しましょう。
「rails s」でローカルサーバーを立ち上げて、「http://localhost:3000/」にアクセスします。
|
1 |
$ rails s |
「http://localhost:3000/」にアクセスして、以下の画面が現れたら成功です。

\文字より動画で学びたいあなたへ/
Udemyで講座を探す >Ruby on RailsのプロジェクトにBootstrapを導入しよう!
では、先ほど作成したプロジェクトにBootstrapを導入していきます。
まずはBootstrapのページに行き、「Download Bootstrap」をクリックしてください。

そして、左側にある「Download Bootstrap」より、zipファイルをダウンロードします。

zipファイルの解凍ができたら、ファイルの中に
・CSSフォルダ
・fontsフォルダ
・jsフォルダ
の3つのフォルダがあるかと思います。

今回はその中にある
・bootstrap-theme.css
・bootstrap.css
・fontsフォルダ
・bootstrap.js
の4つを使います。これら4つのファイルとフォルダを以下のようにアプリケーションフォルダに配置します。
・vendor/assets/javascriptsフォルダに「bootstrap.js」を配置
・vendor/assets/stylesheetsフォルダに「bootstrap.css」と「bootstrap-theme.css」を配置
・vendor/assets/に「fontsフォルダ」を配置
します。
以上の配置が完了したら、app/assets/stylesheets/application.cssを以下のように編集します。
|
1 2 3 4 5 6 7 8 9 10 11 12 13 14 15 16 |
/* * This is a manifest file that'll be compiled into application.css, which will include all the files * listed below. * * Any CSS and SCSS file within this directory, lib/assets/stylesheets, vendor/assets/stylesheets, * or any plugin's vendor/assets/stylesheets directory can be referenced here using a relative path. * * You're free to add application-wide styles to this file and they'll appear at the bottom of the * compiled file so the styles you add here take precedence over styles defined in any styles * defined in the other CSS/SCSS files in this directory. It is generally better to create a new * file per style scope. * *= require bootstrap *= require_tree . *= require_self */ |
※元のソースコードに13行目の「*= require bootstrap」を加えています。
また、app/assets/javascripts/application.jsを以下のように編集します。
|
1 2 3 4 5 6 7 8 9 10 11 12 13 14 15 16 17 |
// This is a manifest file that'll be compiled into application.js, which will include all the files // listed below. // // Any JavaScript/Coffee file within this directory, lib/assets/javascripts, vendor/assets/javascripts, // or any plugin's vendor/assets/javascripts directory can be referenced here using a relative path. // // It's not advisable to add code directly here, but if you do, it'll appear at the bottom of the // compiled file. // // Read Sprockets README (https://github.com/rails/sprockets#sprockets-directives) for details // about supported directives. // //= require jquery //= require jquery_ujs //= require turbolinks //= require bootstrap //= require_tree . |
※元のソースコードに16行目の「//= require bootstrap」を加えています。
これでRuby on RailsにBootstrap導入の準備ができました。
次の章からは実際にBootstrapを使っていきましょう!
Bootstrapを使ってみよう!
では、実際にBootstrapを使っていきます。
今回はscaffoldを使ってアプリケーションを作成していきます。
※scaffoldを詳しく学習したい人は、scaffoldについて解説した記事をご覧ください。
では、以下のコマンドをターミナルに打ち込んでください。今回はTweetモデルに対して、titleカラムとtextカラムを作成します。
|
1 |
$ rails g scaffold Tweet title:string text:text |
では、サーバーを起動させて、「localhost:3000/tweets」にアクセスしましょう。以下の画面になれば成功です。

では、この画面にBootstrapを使ってみましょう。
今回はBootstrapでボタンを作ってみます。BootstrapのButton Groupのページに行きます。
今回はその下にある「Basic example」というソースコードをコピーします。

そして、app/views/tweets/index.html.erbを開いて、一番下に先ほどコピーしたソースコードを貼り付けます。
すると、index.html.erbは以下のようになるかと思います。
|
1 2 3 4 5 6 7 8 9 10 11 12 13 14 15 16 17 18 19 20 21 22 23 24 25 26 27 28 29 30 31 32 33 34 35 |
<p id="notice"><%= notice %></p> <h1>Listing Tweets</h1> <table> <thead> <tr> <th>Title</th> <th>Text</th> <th colspan="3"></th> </tr> </thead> <tbody> <% @tweets.each do |tweet| %> <tr> <td><%= tweet.title %></td> <td><%= tweet.text %></td> <td><%= link_to 'Show', tweet %></td> <td><%= link_to 'Edit', edit_tweet_path(tweet) %></td> <td><%= link_to 'Destroy', tweet, method: :delete, data: { confirm: 'Are you sure?' } %></td> </tr> <% end %> </tbody> </table> <br> <%= link_to 'New Tweet', new_tweet_path %> <div class="btn-group" role="group" aria-label="..."> <button type="button" class="btn btn-default">Left</button> <button type="button" class="btn btn-default">Middle</button> <button type="button" class="btn btn-default">Right</button> </div> |
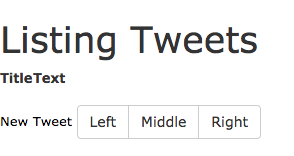
では、Bootstrapが適応されたかを確認しましょう。再び「localhost:3000/tweets」にアクセスしましょう。
すると、以下のような画面になるかと思います。

ちゃんとBootstrapが適応されていますね。CSSを一度も記述することなくボタンが生成されました。
【PHP, MYSQL, Apache】ガチで学びたい人のためのWEB開発の基礎(バックエンド編)

WEBシステムの基本的な仕組みやその挙動、コーディングからシステム構築までWEBシステムの基礎について徹底的に学びます。Laravelなどのフレームワークを用いた開発を考えている人は是非一度基礎を学んでください。
\無料でプレビューをチェック!/
講座を見てみる評価:★★★★★
ウェブ開発の広い範囲の知識を学ぶことができます。めちゃくちゃおすすめです。
個人的にフロンドエンドのことはぼちぼち分かってきて、バックエンドの理解も深めたいと思い、PHPやLaravelを少しだけかじった状態で受講しました。そういう人には特におすすめしたいです。めちゃくちゃたくさんのことを学ぶことができます!
評価:★★★★★
網羅的で隅々まで知識の行き届いた素晴らしい教材です。
バックエンドって何をするのだろうと漠然に思っている人でも、一から学ぶことができます。メインはPHPで学びますが、バックエンドのメカニズムを知るにはとても参考になると思います。
Jsでバックエンドの技術を学びたいのであれば、Mafia先生のNode.js講座を学ぶと良いと思います。


最新情報・キャンペーン情報発信中